How to Create Shortcuts on iPhone?

How to Create Shortcuts on iPhone?

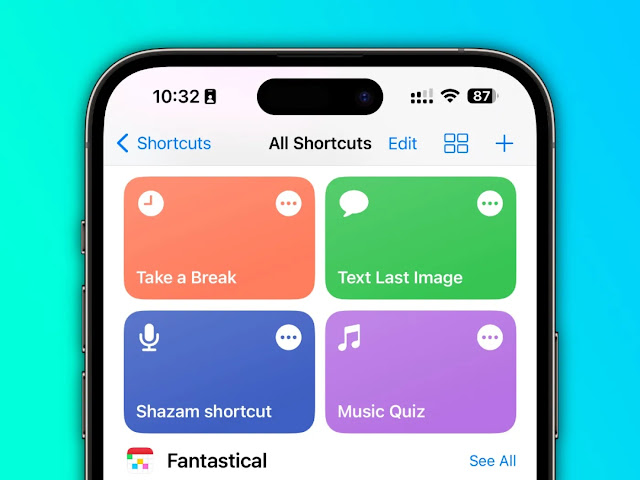
Looking for a way to create shortcuts on your iPhone to automate certain tasks? Apple has provided a dedicated Shortcuts app that comes pre-installed across all iPhone models running on iOS 13 and later. This single app is all you need to create shortcuts to let your iPhone perform certain actions automatically in a sequence. These can be something that you want Siri to do after receiving your voice command or could be a feature that you wanted to enable at a particular point of time.

The Shortcuts app — a standalone and upgraded version of Siri Shortcuts that was introduced with the release of iOS 12 in 2018 — is designed to make things easier for users. It can be used to create automated workflows such as creating a schedule for your morning, generating expense reports after you complete your recent purchase, or look for a nearby coffee shop before reaching home.

Apple has provided a gallery of preset shortcuts from where you can pick the one you need. Alternatively, you can also create shortcuts of your own — depending on your requirement. Here’s how it can be done.

How to create shortcuts on iPhone

To create shortcuts, you must make sure that your iPhone is running on at least iOS 13. There is the dedicated Shortcuts app that Apple has provided by default. However, if you have uninstalled the app for some reason, you can download it from the App Store.

  1. Open the Shortcuts app on your iPhone.
  2. Tap the Plus (+) button from the top-right corner of your screen.
  3. Now, hit Add Action to pick an action you want to perform.
  4. Your iPhone will now show you with the list of available apps and actions. It will also suggest some actions based on your iPhone usage.
  5. The app will show you the selected action on the New Shortcut screen. You can edit the action you’ve picked by tapping on any of the highlighted actions.
  6. Press the Plus (+) button to add another action. It is important to note that by default, your previous action will appear on the screen. You can, however, view all the available actions by tapping the close button.
  7. Once you’re done with the actions you want, you can test your workflow by pressing the Play button.
  8. Now, tap Next and enter a name for your custom shortcut.
  9. Press Done to save your shortcut.

The saved shortcut will appear on the My Shortcuts section on the Shortcuts app. You can also duplicate your saved shortcut or delete it with a press-and-hold gesture on that particular shortcut. Moreover, you can reorder shortcuts to arrange them as per your priority.

How to Turn Off Read Receipts in Facebook, iMessage and WhatsApp?

How to Turn Off Read Receipts in Facebook,  iMessage and WhatsApp?
How to Turn Off Read Receipts in Facebook,  iMessage and WhatsApp?


WhatsApp, Facebook Messenger, and Apple’s iMessage — all three apps have the read receipt function that notifies the sender when the receiver has read their message. Read receipts are an important part of communication through messaging apps. It allows users to understand whether their message has been seen by the recipient or not. 

WhatsApp, Facebook Messenger, and iMessage support the read receipt function by has different ways of notifying the sender that their message has been read. But if you like to keep things more private and not allow the sender the freedom to know when you have read their message, you can turn these read receipts off at any time. 

For instance, if you keep your read receipts on WhatsApp a blue tick appears next to the message when the recipient has read it.

We’ve compiled a step by step guide on how to turn off read receipts on apps like WhatsApp, Facebook Messenger, and Apple’s iMessage.

How to turn off read receipts in WhatsApp

In order to close read receipts on your WhatsApp, follow these steps.

  1. Open the WhatsApp app. Click on the three dots icon on the top-right corner of the screen. Click on Settings.
  2. Once in Settings, click on Account > Privacy.
  3. An option called Read Receipt can be found here. Toggle it off to disable it in individual chats. You cannot disable read receipts for group chats.

How to turn off read receipts in iMessage

Turning off read receipts on iMessage requires a few more steps than WhatsApp.

  1. Head to the iMessage app on your iOS device.
  2. Go to Settings and tap on Messages.
  3. An option called Send Read Receipts can be found here. Toggle it off to disable the ability completely.
  4. If you want to disable read receipts for specific chats, head to that user’s chat and click on the user’s profile pic.
  5. Select Info icon and toggle off Send Read Receipt option.

How to turn off read receipts on Facebook Messenger

In Facebook Messenger, unfortunately, there is no option to disable read receipts. There is an option in settings called Active On, which helps in disabling the Active Now banner attached to your name every time you come online. It also shows the last time you were online, and toggling this off will not let your friends see that information. This can be found by going in the Messenger app > clicking on the profile icon > From Active ‘On’ > Toggle it ‘Off’. However, there is also a workaround for reading a message without letting the sender know.

  1. After you receive a new message on Facebook Messenger, just turn on Airplane Mode from your phone’s Settings, which will disable Internet and network connections on the device.
  2. You can then open Messenger and view the message without an Internet connection.
  3. After you finish reading, close the app, and swipe it out of your app drawer.
  4. You can now turn off Airplane mode. This way the sender will not be notified that you have read their message till you open the app again.

How to Delete My Activity History on Google Search on PC and Mobile?

How to Delete My Activity History on Google Search on PC and Mobile?

Google knows everything! Whether it’s your favourite place, your favourite music, or anything else, Google gives you accurate results whenever you search on its platform. This is primarily because Google saves all these activities in your Google account. The company uses this data to provide a personalised experience based on your search history. However, if you don’t want Google to track your search history, it’s better to delete it simply.

Moreover, you can also turn off the tracking. So, how do you do it? In this guide, we will give you a step-by-step guide for deleting your activity on Google search.

Delete your Google search history on your PC or Mac

One can quickly delete the Google search history and other activities on your laptop or PC. Here’s everything you need to know.

Delete Search History on Chrome

Follow these steps to delete the search history on Google Chrome installed on your PC or Mac system.

  1. Open Google Chrome on your laptop or PC, then click on three vertical dots in the top-right corner.
  2. Go to the History option and click History from the menu. Alternatively, you can also press Cltr + H on Windows or Cmd + Y on Mac.
  3. Now, click on Clear Browsing data, which will appear on the left side of the menu.
  4. Tick the mark on the Browsing history box and then click on Clear Data.

With this, you can delete your Google search history from your Chrome browser. However, it is important to note that the above-mentioned method will only delete your Google search history from the Chrome browser,

Delete Search History from your Google Account

If you want to delete my activity history, you need to delete it from your Google account. Clearing all the history from your account will delete the search history from all the devices you are logged in to, websites you have visited, and even the videos you have watched. Here’s how you can do it.

  1. Open Google Chrome and search for Google’s My Activity page.
  2. Login or select the desired account from which you want to delete the search history.
  3. Just beneath the search bar, you will find the Delete option.
  4. Select the range from which you want to delete the search history. You can also select All Time to delete all the Google search history.
  5. You will see a pop-up message to confirm whether you want to delete your Search historyClick on Delete.

With this, Google will clear all the browsing history from your Google account.

Delete your Google Search History on Android

One can also effortlessly delete the search history on your Android smartphone. There are two ways through which you can delete the Google search history from your Android phone, including Google Search and Google Chrome. Here’s how you can do it:

Via Google Search App

Follow these steps to delete your history using the Google Search application:

  1. Open the Google application on your Android smartphone and then click on your profile image.
  2. Go to Search History from the menu.
  3. Select the Delete option and select the date range according to your need. You can select from Today, a custom range, Delete All Time, and more.
  4. Once done, select the Delete option and your search history will be deleted automatically.

Via Google Chrome

In this section, we will discuss how to delete Google search history from the Chrome browser on your Android smartphone.

  1. Open the Google Chrome application on your Android device and tap on the three dots in the top-right corner.
  2. Select History from the menu and then tap on Clear browsing data.
  3. Tap on the Browsing history option from the list and select the time range.
  4. Once done, tap on Clear Data.

Delete your Google Search History on iOS

Deleting your Google search history on iOS is slightly different from Android. Here’s how you can do it:

  1. Open the Google Chrome application on your iOS device.
  2. Tap on the three horizontal dots at the bottom right corner of the app.
  3. Tap on the History option from the menu.
  4. Now, tap on Clear Browsing Data at the bottom of the app.
  5. From the menu, select Browsing History from the options. Moreover, select the time range for the browsing history you want to delete.
  6. Tap on the Clear Browsing button and then again on the same to confirm.

With this, you can easily delete your browsing history on your iOS device.

How to set the Auto-Delete for Google My Activity History

Google also allows you to auto-delete your search history. The Google My Activity page allows you to delete your search, web, and activity history every three, 18, or 36 months. Here’s how to activate this feature.

  1. Open the Google My Activity page on your Chrome or any other browser.
  2. Go to the Web & App Activity section and scroll down to the Auto-delete option.
  3. Click on Choose an auto-delete option and select the duration of the auto-delete activity. One can select from three, 18, or 36 months.
  4. Click on Next, and you will see a list of search histories for that tenure. Click on Confirm.

This will allow you to auto-delete all search activity from your Google account for a fixed tenure.

How to Stop Tracking in Google My Activity?

Many users don’t want Google to track their browsing history. However, the company gives you the option to limit its tracking on the My Activity page. Here’s how you can stop tracking your search history:

  1. Open the My Activity page on your desktop or mobile device.
  2. Click on the Web & App Activity section and select Turn off on the next page.

This will allow you to stop tracking in the future. However, please note that turning off tracking may affect the personalized experience that Google provides based on your search history. Moreover, you can use the same steps to turn off Location History and YouTube history on the My Activity page.

Crash Landing on You: Heart touching romance K-Drama Review and Story


Crash Landing on You: Heart touching romance K-Drama Review and Story


Crash Landing on You is a Korean drama that has won hearts not only in Korea but all over the world. Here’s why it’s considered a highly romantic K-drama:

Crash Landing on You: Unique story

The story revolves around Yoon Se-ri, a successful South Korean businesswoman who accidentally falls into North Korea while paragliding during a typhoon. There, she meets Ri Jong-hyeok, a North Korean army captain, and their unexpected love becomes the center of the story. This gives a new direction to the border crossing love story with social tension, which is different from typical romantic dramas.

Crash Landing on You: Heart touching romance

One day, when Yoon Se-ri (Son Ye-jin) is paragliding in Seoul, a sudden tornado disorients her and knocks her unconscious. She wakes up and finds her paraglide hanging from a tree in a forest on the North Korean side of the DMZ. There she meets Ri Jeong-hyeok (Hyun Bin), who eventually shelters her and tries to help her return to South Korea secretly. Over time, they fall in love, despite the division between their respective countries.
In South Korea, Yoon Se-ri’s family suppressed news of her disappearance, fearing it would affect Queens Group’s share price. Just before Se-ri’s disappearance, her retired father told his family that he wanted to make her his successor based on her ability as a businesswoman, as Se-ri started her own company, Proved it by making a series choice. That he is capable but his half brothers, Yoon Se-joon (Choi Dae-hoon) and Yoon Se-hyung (Park Hyung-soo), do not like this as they wanted to become the successor themselves.
Se-ri and Jeong-hyeok’s story is intertwined with that of Seo Dan (Seo Ji-hye) and Gu Seung-joon (Kim Jung-hyun). Dan is the daughter of a wealthy North Korean department store owner. She has been studying in Russia for several years, but has returned to marry Jeong-hyeok, to whom she is engaged, although they have only met a few times. As she returns to Pyongyang, she meets several times with Gu Seung-joon, who has fled to North Korea to escape from Se-hyung, who is keeping a large amount of money under Se-hyung’s watch in South Korea. Had manipulated.
Jeong-hyeok’s attachment to Se-ri in North Korea is not appreciated by not only Dan, her fiancé, but also her father, a high-ranking political figure. Because if people found out that Jeong-hyeok harbored a South Korean citizen, it could be used by rival authorities to ruin his family.
In the second part of the story (episodes 10–16), Se-ri has returned to South Korea and resumes leading her company, surprising her family and others who had assumed her dead. Elsewhere in North Korea, Cheol-gang was convicted and sentenced to life imprisonment, but he escaped from custody and Se-ri infiltrated South Korea to seek revenge.
Jeong-hyeok goes to South Korea to rescue Se-ri from the Cheol-gang. But he meets Seri and stays at her house, and discovers Cheol-gang here in North Korea as his father has sent his men to Seoul to bring him back. Meanwhile, in North Korea, Dan and Seung-joon fall in love and she shelters him when corrupt officials betray Se-hyung to his gangsters. climax is the best

why see

If you want to watch a great romantic love story K-Drama then don’t miss it.

How to Activate Jio SIM Card?

How to Activate Jio SIM Card?


Reliance Jio is the largest telecom provider in India when it comes to wireless subscriber base as per latest data by Telecom Regulatory Authority of India (TRAI). It holds 35.54 percent market share compared to Airtel’s 29.83 percent and Vodafone Idea’s (Vi) 24.20 percent.

 Jio also added the most subscribers in February this year with about 4.2 million new wireless subscribers. A lot of customers prefer Jio over other operators due to the services it offers, as well as the budget friendly plans. Customers who are not using Jio SIM cards can easily purchase one or port to Jio and once they get their SIM, it will need to be activated.

The Jio SIM activation process can be started once you have procured a new SIM card. After submitting all documents, customers are sent an SMS on their alternate number that asks them to tele-verify. In case you do not receive the SMS, you may have to wait for up to 7 days or call 1800-8899-999 to check status of your application.

How to activate your Jio SIM (voice + data)

  1. Using the phone that has your Jio SIM, call 1977.
  2. You will be asked to enter a five-digit T-PIN (Tele-verification PIN) to complete the tele-verification process. This PIN should be present in the SMS that was sent to your alternate number.
  3. In case you didn’t receive a T-PIN on your alternate number, call 1977 or 1800-890-1977 to resend T-PIN.
  4. Enter the five digit T-PIN.
  5. Alternatively, you can enter the last four digits of your Aadhaar number.
  6. After your complete the steps successfully, your Jio SIM should be activated.

In case your SIM is not activated, wait for a few hours. If it still does not activate, contact Jio customer support. It should be noted that the tele-verification process needs to be completed within 30 days of placing the order for a new SIM. If not done, the order will be cancelled.

How to activate your Jio SIM (data only) 

  1. If you wish to activate only data services on your Jio SIM, dial 1800-890-1977 from any number. 
  2. Choose your preferred language. 
  3. You will be asked to enter your Jio number. 
  4. Once done, data services should be activated on your Jio SIM.

How to Cancel Amazon Prime Membership in India?

How to Cancel Amazon Prime Membership in India?


Amazon Prime membership cancellation is easy and takes just a few steps. Amazon offers a list of benefits to Prime members. These include free one-day and two-day deliveries, early access to regular sale events and Lighting Deals, and no minimum order requirement for free standard deliveries. Customers on Amazon Prime also get access to other services offered by the US company. These include Amazon Prime Music, Prime Video, and Prime Reading. Amazon also offers same-day deliveries to Prime members for eligible addresses.

Having said that, there could be some valid reasons that could lead you to cancel your Amazon Prime subscription. The one major reason is the price at which the Prime membership is available. It costs Rs. 329 for three months or Rs. 999 a year to Amazon customers in India. Although the membership is cheaper in the country when compared with the Prime membership in the US where you get Amazon Prime at a monthly charge of $12.99 (roughly Rs. 960) or annually at $119 (roughly Rs. 8,760), it may no longer make sense for you to continue.

One should note, if you choose to cancel your Amazon subscription in India, it will continue for the period you’ve already paid for — in other words, if you paid for an annual membership, after cancelling, it will continue till the end of the one-year period from the date you subscribed. Likewise, if you have opted for the quarterly membership, it will continue till the end of the three-month period from the date you subscribed. Thus, all cancelling a subscription does is prevent it from auto-renewing. Customers can, however, reach out to Amazon’s customer care team from its app or website to ask for cancelling the Prime subscription instantly — forfeiting their remaining membership period. 

You can end your Prime membership at any time by visiting the Amazon website on your computer or through its app on your smartphone. Here’s how you can do that.

How to cancel your Amazon Prime membership

Below are the steps that you can follow to cancelling your Amazon Prime membership. These steps are for cancelling the Prime membership through Amazon’s site. You can, however, move to the next section to understand how you can cancel the Amazon Prime subscription from its app.

  1. Visit Amazon.in website and sign in with your account.
  2. Click on the hamburger menu button from the top-left side and select Your Account.
  3. Now, hit the Prime option.
  4. Click on the Manage membership link. A drop-down list will appear. Select Manage Membership.
  5. Hit the End membership option.
  6. Amazon will now show a screen to highlight how much you have saved in delivery fees since you have joined the membership. Click Continue to Cancel there.
  7. You will now see a screen showing the End on [expiry date of your Prime membership] button. This will essentially end your Prime membership once it reaches the renew date.

You can also get a reminder three days before your Prime membership renews by hitting the Remind me later button.

Amazon also shows an End Now button for the first three days of the Prime membership to let customers end their subscription on an immediate basis — if they aren’t satisfied with the service. In this case, the company will provide refund for full membership or the remaining period if the customers used any of the bundled services such as Prime Video or Prime Music. The refund will be provided through a credit note.

How to cancel your Amazon Prime membership using the app

You can follow the steps available below to end your Amazon Prime membership using its app on your smartphone.

  1. Go to the Amazon app on your phone.
  2. Tap the hamburger menu button from the bottom-right side.
  3. Now, tap Prime.
  4. Select the Manage My Membership next to the Prime title.
  5. Tap the Manage membership drop-down menu and then select the Manage Membership option.
  6. Hit End membership.
  7. Scroll down on the screen showing how much delivery fee you have saved since you have joined the membership.
  8. Tap Continue to Cancel and then the End on [expiry date of your Prime membership] button.

It is important to note that once you’ve cancelled your Prime membership, you will no longer be able to receive any Prime exclusive offers and services such as Prime Video and Prime Music.

How to Delete or Deactivate Instagram Account on Mobile and Laptop?

How to Delete or Deactivate Instagram Account on Mobile and Laptop?

 Instagram is one of the few social media platforms that are now engraved into our lifestyles. Whether sharing your vacation photos on Story, watching reels, or keeping a tab on your friends, Instagram is one platform to get all these. However, having so much screen time on the platform can be overwhelming for many. This is why people prefer to delete their Instagram account to get a breather or even take a small break from the social media platform by deactivating it. But how do you do it? In this guide, we will help you with the steps to delete your Instagram account. If you don’t want to delete your account permanently, then there is also an option to deactivate it. So, without wasting much time, let’s begin. 

How to Delete an Instagram Account on Mobile (Android or iOS)

Here’s how you can delete your Instagram account from your Android or iOS device. 

Step 1: Open the Instagram application on your Android or iOS device. 

Step 2: Go to Account Profile by clicking on the Hamburger menu. 

Step 3: Open Account Centre and then go to Personal Details 

Step 4: Now, tap on Account Ownership and Control and select the Deactivation or Deletion option. 

Step 5: Select the account you want to remove and select Delete account, then tap on Continue. 

Step 6: Select the reason for deleting your account. Enter your Instagram account password and follow the on-screen instructions to delete your Instagram account permanently. 

How to Delete an Instagram Account on a PC or Laptop 

Instagram gives you two options to permanently delete your Instagram account on a PC or laptop. Check both the methods below: 

Method 1

Step 1: Sign into your Instagram account on any browser on your computer. Enter the following link: https://www.instagram.com/accounts/remove/request/permanent/

Step 2: Now, select the reason from the drop-down menu and re-enter your Instagram password. 

Step 3: Click the Delete button, and your account will be permanently deleted. 

Method 2: 

Step 1: Open the Instagram application on your browser. 

Step 2: Click on the Hamburger menu at the bottom and select the Accounts Centre option. 

Step 3: Go to Personal details > Account Ownership and Control> Deactivation or deletion

Step 4: Select the account you wish to delete and tap on Delete account on the next screen. 

Step 5: Enter your password and follow the prompts to delete your Instagram account. 

How to Deactivate an Instagram Account

If you want to take a break from Instagram, you can deactivate it. With this feature, you can log back into your Instagram account anytime and use it as it is. Here’s how you can deactivate your Instagram account on mobile and laptop. 

Deactivate your Instagram Account on Android or iOS 

Here’s how you can deactivate your Instagram account from your Android or iOS device: 

Step 1: Open the Instagram application on your Android or iOS device. 

Step 2: Click on the Hamburger menu and then go to the Account Centre option. 

Step 3: Click on the Personal Details and then tap on Ownership and Control option. 

Step 4: Now, tap on the Deactivation or Deletion option. 

Step 5: Select the profile you want to deactivate and tap on it. 

Step 6: Tap on the Deactivate account option and tap on Continue

Step 7: Enter your password and follow the on-screen instructions to deactivate your Instagram account. 

Deactivate Instagram Account on PC or Laptop 

Here’s how you can deactivate your Instagram account on your computer. 

Step 1: Open the Instagram website on your browser. 

Step 2: Select the Accounts Centre option from the Hamburger menu at the bottom.

Step 3: Go to Personal details > Account Ownership and Control> Deactivation or Deletion

Step 4: Select the desired account and then click on Deactivate account

Step 5: Enter your password and follow the prompts to delete your Instagram account. 

How to Reactivate Instagram Account

Instagram allows you to reactivate your account if you change your mind after deleting or deactivating it. There is a 30-day window after you delete or deactivate your account. If you wish to reactivate your account during this tenure, you can simply log in to the Instagram application and enter your username and password. With this, you can easily use your account. 

How to Book Train Tickets via IRCTC in Smartphone?

How to Book Train Tickets via IRCTC in Smartphone?

 IRCTC’s Web portal helps passengers book train tickets and also help out in all other related services. However, it also offers an app that can help anyone carry out tasks such as booking a ticket and much more. IRCTC, or Indian Railway Catering and Tourism Corporation, handles inter-city and inter-state travel bookings across India. Apart from the IRCTC website and app, users in India can also books train tickets through aggregators such as Paytm, MakeMyTrip, Cleartrip, RailYatri, Confirmtkt, and many more. 

How to book online IRCTC train tickets on mobile

In order to book a train ticket on your smartphone, download the IRCTC Rail Connect app from the Google Play store or Apple App Store. If you are a new user, you will need to register before you begin to use the app. There is a IRCTC Web portal as well that users can head to via the mobile browser, but registration on the browser platform is also necessary. To book a train ticket via the IRCTC mobile app, follow the steps below.

  1. Install IRCTC Rail Connect. Register yourself. Login using the newly created credentials.
  2. Click on Plan My Bookings on the homepage. Enter departure station and designation station information, the date on which you wish to travel, and click on Search Trains.
  3. A list of trains, their timing of departure, and the available (or non-availability) of stocks will be mentioned. The availability will also be segregated based on classes like Sleeper class, A/C, and more.
  4. Clicking on the class will reveal the price of the ticket. Once you’ve decided the train and class, click on Passenger Details.
  5. You can add a maximum of up to six adults and two infants in one booking. IRCTC asks for the destination address as well. Fill in the details and accept the terms and conditions by clicking on the check boxes. Click on Review Journey Details.
  6. Scan through the train information, the class booked, and the passenger information. If you’re satisfied with all the details, click on Proceed to Pay after filing in the CAPTCHA code at the bottom of the page.
  7. Pay using your mobile wallets, debit card, credit card, or net banking. Once the payment is done, users can find their tickets in transaction history.

How to Check iPhone Battery Health?

How to Check iPhone Battery Health?

 Checking iPhone battery health is vital as it allows you to understand whether the inbuilt battery needs to be replaced. Poor battery health means that you would get fewer hours of usage between charges on your iPhone. Apple introduced the native tool to check battery health of your iPhone with the release of iOS 11.3 back in 2018. It is accessible across all iPhone models starting from iPhone 6. You can also find the same battery health tool on your iPad.

In this article, we are detailing the steps you need to follow to check your iPhone battery health

How to check your iPhone battery health?

Before beginning with the steps you need to follow to check your iPhone battery health, it is important to note that the battery health tool available from Apple normally provides information on two distinct areas — maximum battery capacity available on your device and its peak performance capability. While the maximum battery capacity gives a measurement of the battery capacity in relation to when it was new, peak performance capability is measured to highlight whether the battery of your iPhone is currently supporting normal peak performance, or the performance management features are in place to restrict peak power.

  1. Go to Settings.
  2. Scroll down and tap the Battery option. You can also search for the battery settings directly through the search bar in the settings menu by swiping up.
  3. Tap Battery Health.

You’ll then see the maximum capacity and peak performance capability of your iPhone battery. Apple will also show important battery notifications if the iPhone battery health is significantly degraded or if a new replacement battery is not verified by the system.

How to Create Shortcuts on iPhone to Automate Tasks?

How to Create Shortcuts on iPhone to Automate Tasks?

Looking for a way to create shortcuts on your iPhone to automate certain tasks? Apple has provided a dedicated Shortcuts app that comes pre-installed across all iPhone models running on iOS 13 and later. This single app is all you need to create shortcuts to let your iPhone perform certain actions automatically in a sequence. These can be something that you want Siri to do after receiving your voice command or could be a feature that you wanted to enable at a particular point of time.

The Shortcuts app — a standalone and upgraded version of Siri Shortcuts that was introduced with the release of iOS 12 in 2018 — is designed to make things easier for users. It can be used to create automated workflows such as creating a schedule for your morning, generating expense reports after you complete your recent purchase, or look for a nearby coffee shop before reaching home.

Apple has provided a gallery of preset shortcuts from where you can pick the one you need. Alternatively, you can also create shortcuts of your own — depending on your requirement. Here’s how it can be done.

How to create shortcuts on iPhone

To create shortcuts, you must make sure that your iPhone is running on at least iOS 13. There is the dedicated Shortcuts app that Apple has provided by default. However, if you have uninstalled the app for some reason, you can download it from the App Store.

  1. Open the Shortcuts app on your iPhone.
  2. Tap the Plus (+) button from the top-right corner of your screen.
  3. Now, hit Add Action to pick an action you want to perform.
  4. Your iPhone will now show you with the list of available apps and actions. It will also suggest some actions based on your iPhone usage.
  5. The app will show you the selected action on the New Shortcut screen. You can edit the action you’ve picked by tapping on any of the highlighted actions.
  6. Press the Plus (+) button to add another action. It is important to note that by default, your previous action will appear on the screen. You can, however, view all the available actions by tapping the close button.
  7. Once you’re done with the actions you want, you can test your workflow by pressing the Play button.
  8. Now, tap Next and enter a name for your custom shortcut.
  9. Press Done to save your shortcut.

The saved shortcut will appear on the My Shortcuts section on the Shortcuts app. You can also duplicate your saved shortcut or delete it with a press-and-hold gesture on that particular shortcut. Moreover, you can reorder shortcuts to arrange them as per your priority.

You can also bring your shortcuts to a widget for easy access directly from your homescreen. Apple also lets you share your favourite shortcuts with anyone to let them use the same automated workflow on their iPhone — without requiring to manually add the steps you followed.