Computer – Data and Information

Computer - Data and Information
Computer – Data and Information

Data can be defined as a representation of facts, concepts, or instructions in a formalized manner, which should be suitable for communication, interpretation, or processing by human or electronic machine.

Data is represented with the help of characters such as alphabets (A-Z, a-z), digits (0-9) or special characters (+,-,/,*,<,>,= etc.)

What is Information?

Information is organized or classified data, which has some meaningful values for the receiver. Information is the processed data on which decisions and actions are based.

For the decision to be meaningful, the processed data must qualify for the following characteristics −

  • Timely − Information should be available when required.

  • Accuracy − Information should be accurate.

  • Completeness − Information should be complete.


Data Processing Cycle

Data processing is the re-structuring or re-ordering of data by people or machine to increase their usefulness and add values for a particular purpose. Data processing consists of the following basic steps – input, processing, and output. These three steps constitute the data processing cycle.

  • Input − In this step, the input data is prepared in some convenient form for processing. The form will depend on the processing machine. For example, when electronic computers are used, the input data can be recorded on any one of the several types of input medium, such as magnetic disks, tapes, and so on.

  • Processing − In this step, the input data is changed to produce data in a more useful form. For example, pay-checks can be calculated from the time cards, or a summary of sales for the month can be calculated from the sales orders.

  • Output − At this stage, the result of the proceeding processing step is collected. The particular form of the output data depends on the use of the data. For example, output data may be pay-checks for employees.

Computer – Networking

Computer - Networking
Computer – Networking

computer network is a system in which multiple computers are connected to each other to share information and resources.

Characteristics of a Computer Network

  • Share resources from one computer to another.

  • Create files and store them in one computer, access those files from the other computer(s) connected over the network.

  • Connect a printer, scanner, or a fax machine to one computer within the network and let other computers of the network use the machines available over the network.

Following is the list of hardware’s required to set up a computer network.

  • Network Cables
  • Distributors
  • Routers
  • Internal Network Cards
  • External Network Cards

Network Cables

Network cables are used to connect computers. The most commonly used cable is Category 5 cable RJ-45.

Distributors

A computer can be connected to another one via a serial port but if we need to connect many computers to produce a network, this serial connection will not work.

The solution is to use a central body to which other computers, printers, scanners, etc. can be connected and then this body will manage or distribute network traffic.

Router

A router is a type of device which acts as the central point among computers and other devices that are a part of the network. It is equipped with holes called ports. Computers and other devices are connected to a router using network cables. Now-a-days router comes in wireless modes using which computers can be connected without any physical cable.

Network Card

Network card is a necessary component of a computer without which a computer cannot be connected over a network. It is also known as the network adapter or Network Interface Card (NIC). Most branded computers have network card pre-installed. Network cards are of two types: Internal and External Network Cards.

Internal Network Cards

Motherboard has a slot for internal network card where it is to be inserted. Internal network cards are of two types in which the first type uses Peripheral Component Interconnect (PCI) connection, while the second type uses Industry Standard Architecture (ISA). Network cables are required to provide network access.

External Network Cards

External network cards are of two types: Wireless and USB based. Wireless network card needs to be inserted into the motherboard, however no network cable is required to connect to the network.

Universal Serial Bus (USB)

USB card is easy to use and connects via USB port. Computers automatically detect USB card and can install the drivers required to support the USB network card automatically.

Computer – Motherboard

Computer - Motherboard
Computer – Motherboard

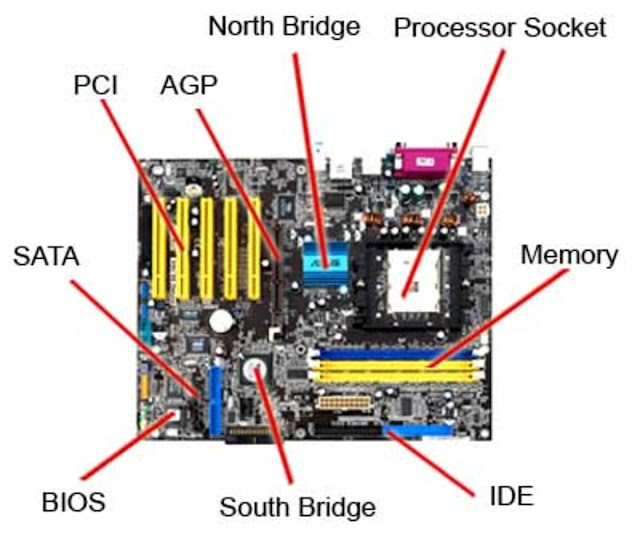
The motherboard serves as a single platform to connect all of the parts of a computer together. It connects the CPU, memory, hard drives, optical drives, video card, sound card, and other ports and expansion cards directly or via cables. It can be considered as the backbone of a computer.

(toc)

Features of Motherboard

A motherboard comes with following features −

  • Motherboard varies greatly in supporting various types of components.

  • Motherboard supports a single type of CPU and few types of memories.

  • Video cards, hard disks, sound cards have to be compatible with the motherboard to function properly.

  • Motherboards, cases, and power supplies must be compatible to work properly together.

Popular Manufacturers

Following are the popular manufacturers of the motherboard.

  • Intel
  • ASUS
  • AOpen
  • ABIT
  • Biostar
  • Gigabyte
  • MSI

Description of Motherboard

The motherboard is mounted inside the case and is securely attached via small screws through pre-drilled holes. Motherboard contains ports to connect all of the internal components. It provides a single socket for CPU, whereas for memory, normally one or more slots are available. Motherboards provide ports to attach the floppy drive, hard drive, and optical drives via ribbon cables. Motherboard carries fans and a special port designed for power supply.

There is a peripheral card slot in front of the motherboard using which video cards, sound cards, and other expansion cards can be connected to the motherboard.

On the left side, motherboards carry a number of ports to connect the monitor, printer, mouse, keyboard, speaker, and network cables. Motherboards also provide USB ports, which allow compatible devices to be connected in plug-in/plug-out fashion. For example, pen drive, digital cameras, etc.

Computer – Hardware

Computer - Hardware
Computer – Hardware

Hardware represents the physical and tangible components of a computer, i.e. the components that can be seen and touched.

Examples of Hardware are the following −

  • Input devices − keyboard, mouse, etc.

  • Output devices − printer, monitor, etc.

  • Secondary storage devices − Hard disk, CD, DVD, etc.

  • Internal components − CPU, motherboard, RAM, etc.


Relationship between Hardware and Software

  • Hardware and software are mutually dependent on each other. Both of them must work together to make a computer produce a useful output.

  • Software cannot be utilized without supporting hardware.

  • Hardware without a set of programs to operate upon cannot be utilized and is useless.

  • To get a particular job done on the computer, relevant software should be loaded into the hardware.

  • Hardware is a one-time expense.

  • Software development is very expensive and is a continuing expense.

  • Different software applications can be loaded on a hardware to run different jobs.

  • A software acts as an interface between the user and the hardware.

  • If the hardware is the ‘heart’ of a computer system, then the software is its ‘soul’. Both are complementary to each other.

Computer – Software

Computer - Software
Computer – Software

Software is a set of programs, which is designed to perform a well-defined function. A program is a sequence of instructions written to solve a particular problem.

There are two types of software −

  • System Software
  • Application Software

System Software

The system software is a collection of programs designed to operate, control, and extend the processing capabilities of the computer itself. System software is generally prepared by the computer manufacturers. These software products comprise of programs written in low-level languages, which interact with the hardware at a very basic level. System software serves as the interface between the hardware and the end users.

Some examples of system software are Operating System, Compilers, Interpreter, Assemblers, etc.

Here is a list of some of the most prominent features of a system software −

  • Close to the system
  • Fast in speed
  • Difficult to design
  • Difficult to understand
  • Less interactive
  • Smaller in size
  • Difficult to manipulate
  • Generally written in low-level language

Application Software

Application software products are designed to satisfy a particular need of a particular environment. All software applications prepared in the computer lab can come under the category of Application software.

Application software may consist of a single program, such as Microsoft’s notepad for writing and editing a simple text. It may also consist of a collection of programs, often called a software package, which work together to accomplish a task, such as a spreadsheet package.

Examples of Application software are the following −

  • Payroll Software
  • Student Record Software
  • Inventory Management Software
  • Income Tax Software
  • Railways Reservation Software
  • Microsoft Office Suite Software
  • Microsoft Word
  • Microsoft Excel
  • Microsoft PowerPoint


Features of application software are as follows −

  • Close to the user
  • Easy to design
  • More interactive
  • Slow in speed
  • Generally written in high-level language
  • Easy to understand
  • Easy to manipulate and use
  • Bigger in size and requires large storage space

How to create a woman’s portrait art in Photoshop?

How to create a woman’s portrait art in Photoshop?

Feeling intimidated by Photoshop’s massive toolset? Follow this easy step-by-step tutorial to learn how to make a simple 2D portrait.


(toc)


A minimal portrait like this would make a perfect accent poster for nearly any space. Plus, a stylized artwork doesn’t require otherworldly drawing skills or expert-level knowledge of Adobe Photoshop. Get your canvas ready and follow along!

Step 1: sketching the outline

The choice of the right canvas size depends on your ultimate goal and whether you’re planning to post your artwork online or print it. I recommend you stick to at least 1500 px for each dimension. Anything smaller than that might limit your options after exporting the final work.

Leave the default white shade for canvas and select a simple hard brush in black to create the outline. Use light and loose lines to define the proportions and pose. To make sure the pose looks natural, study reference pictures before making your first sketch. If you like to organize your reference properly, you can use PureRef to have an inspiration board with all the images in one place.

Step 2: adding facial features

Now that you have the outline ready, it’s time to start working on the details.

Though our portrait is stylized, it’s important to keep the basics of human anatomy in mind when drawing the face. The size, placement, and rotation of the eyes, nose, and lips depend on the positioning of the character’s head. In my case, I have a 3/4 head view, meaning that:

  • only one ear and one side of the nose have to show,
  • the half of the mouth and the eye that are closer to the viewer need to be bigger and more elongated,
  • the cheek that is closer to the viewer has to be fuller and wider.

Step 3: adding details to jewelry and hair

For the primary shades of the hair and jewelry, pick the hard brush in the desired color and fill the areas in. Then work on the intricate details of the jewelry. This can include shading, highlights, or any decorative elements you want to incorporate. If you want to create a color fade effect for the jewelry like the one I did, pick a soft brush that creates gentle, blurred-out color transitions. To make the blend even smoother, you can go over those areas with the Blur tool.

If you don’t like to go back and forth with the brushes, another option would be to set up a gradient fill for these elements or add an inner shadow in a slightly darker yellow hue.

In case you want to add more definition to the hair, you can go back to the hard brush and set its size to just about 4 px. Using a shade that is a little lighter than the base color of the hair, add some strokes that follow the direction of the hairdo.

Step 4: adding the details to the saree

Starting with a wide hard brush again, I fill in the outline of the clothing with the primary color. Because I am making the portrait of an Indian woman, my color of choice is a deep burgundy, which you can often see in saree designs.

After that, using a darker shade and a thinner soft brush, I mimic fabric folds. The main points to keep in mind when adding creases to the clothing are armpits, elbows, knees, hips, and waist — every area where the body bends most often.

To make the fabric look even more realistic, you can add a texture and experiment with its opacity settings. On top of that, you can add subtle highlights with either a hard or a soft brush. In my case, I created a few highlights with a soft brush on the left side that is closer to the lighting source.

Step 5: final touches

At this point, it’s time to take a literal step back from your creation and see what else needs a bit of polishing. A simple hack many digital artists use is flipping the canvas horizontally to see if there’s anything that looks unacceptably wrong. Don’t be too hard on yourself if you decide to do this because pretty much any image is going to look slightly cursed when mirrored. The main thing to look out for here is visual imbalance: if there’s something that instantly makes one side look heavier, it wouldn’t hurt to go back and fix it.

Once you’re done with the touch-ups, you can add a background. Make sure it complements the color palette of the drawing and avoid conflicting or overpowering shades. I chose the gorgeous navy blue and added a gradient and a texture to it to make it a little less flat.

One crucial thing to remember before saving your womanportrait_finalfinalFINAL.psd is that you absolutely have to make sure you’ve hidden or removed all the messy layers. If you started by sketching out the primary shapes or made the outline using sloppy chicken scratches, these layers definitely have to go.

Step 6: print and enjoy

Now that the artwork is nice and clean and ready to become a part of your interior design, you can print it. For a neater, less overwhelming look, I ultimately decided to go for a plain dark blue background instead of a textured one.

And there you have it — your very own stylized 2D portrait of a woman. I learned how to create an artwork like this thanks to Tron Education, a digital art school and production studio. Here’s an important message from my Tron Education teachers that I always keep in mind: “Visualize your art before you start. Visualization gives you the clarity needed to create truly outstanding artworks”.

How to choose File types in graphic design?

How to choose File types in graphic design?

There are instances when even relatively experienced designers start doubting themselves about what file type to use.

To prevent confusion, having a reference to guide you and avoid doubts is useful.

Generally, graphic design files are classified into vector, raster, and hybrid types. Raster is pixel-based and has defined proportions, the vector does not lose resolution when resized, and hybrid allows for vector and raster images to be mixed in the same file.

(toc)

Having said that, let’s delve deeper into separate file types commonly used in graphic design so you know which one to pick.

Vector file types

Vector files don’t use pixels. They are created with mathematical equations, curves, and lines, with points fixed on a grid. Users are free to enlarge or reduce the image size without sacrificing the resolution.

1. AI

The name AI comes from Adobe Illustrator, which many dub the industry-leading vector graphic software.

They support transparency and are scalable to different sizes without sacrificing quality.

If you need to design a logo or edit a vector design, AI is often the go-to option.

One notable disadvantage is that you will need to use Adobe Illustrator if you want to edit the file.

2. CDR

Another example of a file getting its name from the software. Corel Draw is not as popular as Adobe apps, but you can still rely on it for various graphic design tasks.

CDR excels in printing work, but it can still serve just as fine for general design tasks, like banners or logos.

The drawback is similar to AI files in the sense that you have to use specific software to edit the file.

3. EPS

Encapsulated PostScript files fall in the vector category, but they are flexible enough to process raster image data as well.

One more advantage is the fact that you can export EPS files to different formats.

However, if you want to upload an EPS file online in its original format, you will not be able to do it without changing it to other formats, such as JPG or PNG, which can be annoying at times.

4. SVG

Scalable Vector Graphics are essential for web design these days. Website owners want to limit the resources consumed by media, so they look to use minimal-size images. This is where SVG excels. You can reduce the file size without sacrificing the quality.

SVG is also easy to edit with coding languages like CSS or JavaScript, so web developers have fewer hassles to worry about.

If you need to publish a graph or a diagram directly on a website, use SVG. Note, though, that this file format is relatively new in web design, which is why certain browsers will not support it.

The browsers that support SVG include:

  • Safari
  • Google Chrome
  • Mozilla Firefox
  • Opera

The browsers that do not support SVG include:

  • Maxthon (on Android)
  • CM Browser (on Android)
  • Konqueror

Raster file types

Tiny color squares called pixels make a raster file. The pixel number determines image quality. The more pixels an image has, the greater its quality.

1. PSD

Photoshop Document comes directly from Photoshop. You create an editable file with multiple layers and adjust it depending on your needs.

The format also supports vectors, but it is mostly used for raster images. Even though Adobe Photoshop is a raster-based tool, you can still modify vector files as a smart object or rasterized file.

Photo retouching tasks, such as color correction or additional text, call to use PSD. It works for animations, videos, and pretty much anything else you can do with Photoshop.

2. PNG

PNG stands for Portable Network Graphics. As the name suggests, the file format is relied on when one has to transfer images on the internet.

PNG is also great when you are working with graphics that come with limited colors. Lastly, PNG files are small in size, which is an advantage for those working with limited storage.

Overall, the PNG image quality is not optimized for prints. While the file format ensures good quality on a smartphone or computer screen, it will not look appealing as a print. You are better off using other file types for printing.

3. GIF

Graphics Interchange Format is popular all across the web, including social media, messengers, and other apps and websites.

Unlike other image file types,GIFs are not static images. They are animated, which makes them more appealing and engaging to the viewers.

GIFs are lossless, though there are numerous ways you can adjust their size to make them more web-friendly. For instance, you can resize them by removing some of the frames or reducing the number of colors in an image

4. JPG

JPG or JPEG is a widely used image format. Thousands of pixels make a single JPG, which is why the image does not retain the quality when you rescale it.

Try uploading an image in a Google Doc and dragging it around to increase the size. The drop in quality is immediately noticeable.

5. BMP

Bitmap Image Files do not support background transparency and lack compression, which makes them relatively large in terms of size.

Nevertheless, BMP is the go-to option for niche instances, such as 3D UV textures. If you ever see a high-quality image on display somewhere, the odds are it is BMP.

Hybrid file types

The hybrid type receives benefits of raster and vector formats, letting one mix both in the same file. Designers usually encounter hybrid files when using apps like Sketch or Adobe Illustrator, when their work involves both raster and vector elements.

1. PDF

The Portable Document Format file format is universal in how it is used. PDFs are compatible with virtually every device, which is why many ask to receive a final version of a file in this format.

Graphic design tools like Photoshop let you export files directly as PDFs, but you can also find a plethora of various converters online. The sheer popularity and accessibility of PDFs make it easy to find a way to turn a file into a PDF, even if you have no access to professional designer software.

Keep in mind, though, that you need specific tools to edit a PDF, and even then, it is tricky.

2. SKETCH

Designers use SKETCH to create mobile and web application UI as well as app icons for Android and iOS devices.

Sketch, the software used to create the designs, has a basic toolkit, including fill, border, mask, and text addition.

SKETCH is the default file format for saving files locally. Unfortunately, the Sketch app is exclusive to macOS.

If you do not have macOS and want to view the file on MS Windows, you will need to use Icons8 Lunacy, a standalone viewer for SKETCH files on MS Windows.

Conclusion

To sum it all up, a lot goes into managing your digital files. From understanding how to open .rar on Mac to choosing the right image format for your graphic design projects.

Knowing your BMPs and PSDs is crucial if you don’t want to waste your time (and image quality) converting from one file type to another.

In short, vector file types are irreplaceable for stylized digital art, and raster image formats are unbeatable for hyperrealistic photographic images.

Best Free and Paid Cinematic LUTs

 With the help of these free and paid cinematic LUTs you can enhance your Instagram videos and impress your followers with warm and saturated colors. Download this cinematic LUT pack for setting white balance and changing color curves.

Cinematic LUTs are pre-saved settings that make color grading easier and more effective, thus allowing you to enhance your videos in a few clicks. By applying a color toning effect, changing the brightness of your video, or making colors look richer, you will achieve pro-level results in no time regardless of the software product you use.

The LUTs are shared in a .cube file format which is supported by the most widely used video editors, for instance, DaVinci Resolve, Premiere Pro CC, After Effects CC, and Sony Vegas.

1. Professional Cinematic LUTs

cinematic luts cinema look

There are 20 LUTs in this set that allows for adjusting contrast, changing shadows’ temperature, and applying a magenta tone to your video to transform all the colors and make them more saturated. The overall result will remind you of the most mesmerizing color movies. If you deal with water, download one of these water overlays to make it deep and blue.

2. Premiere Pro Cinematic LUTs

cinematic luts cinema look

These 20 Premiere Pro LUTs are a thoughtfully created collection of plug-ins that is suitable for a wide variety of styles. They can improve your wedding, travel, or nature footage. These LUTs make it extremely easy to perform color grading, fix any exposure issue, and improve white balance. Besides, they will bring colors to life by making them richer. If you are a dedicated fan of Hollywood movies, you can recreate the look they convey in a few simple steps.

3. Cinema Look Collection

cinematic luts cinema look

If your video looks dull and unimpressive, try changing its mood by using this cinematic LUT pack. Using them, you can make footage brighter, improve contrast, and add beautiful vintage tones.

There are 80 LUTs in this set, so you will easily find the effects that will make colors sharper, introduce deep tones, and make your video more vintage. There is also helpful information on how to use these LUTs to achieve better results.

4. Film Cinematic LUTs

cinematic luts cinema look

Download these 20 Film LUTs if you want to change the color temperature of your video by making colors warmer or adding cold undertones. Using them, you will quickly change brightness, lightning, contrast, etc. These LUTs will give your videos a splendid vintage effect and make colors warmer. To receive the same effect with your photographs, download these HDR Presets for Lightroom.

5. Wedding Cinematic LUTs

cinematic luts cinema look

This pack consists of cinematic LUTs that are perfect for editing wedding videos. They will come in handy when you need to make white and black colors more beautiful, transform a background, soften tones and make your wedding videos more atmospheric. If you don’t have time for editing wedding photos on your own, refer to one of these wedding image editing services.

6. Universal Cinematic LUTs

cinematic luts cinema look

If you need to use a pro-level color grading tool, take a look at these 20 LUTs. Filmmakers who are looking for stunning cinematic effects will definitely appreciate this set. It will be useful for photographers as well since they can apply LUTs during the photo post-processing stage.

7. Vintage Cinematic LUTs

cinematic luts cinema look

If you need to make the dynamic range wider, split tones and soften blacks, take a look at this pack. Each cinematic LUT allows for achieving amazing results. Beware, though, that they won’t help much with the footage taken in sunny weather.

8. Movie Look LUTs Pack

cinematic luts cinema look

This free set of LUTs has been created for those who strive to master color grading. It has a comprehensive tutorial that explains the basics of color grading in a simple way. While the set contains only a limited number of LUTs, it comes with all the necessary tools. Together with Glitch effect video overlays, it can make your clips look fashionable.

9. Cinematic LUTs for Vlogging

cinematic luts cinema look

If you enjoy vlogging and want to impress your audience by finely edited videos, make sure to check out these cinematic LUTs. By using them, you can enhance white balance and HSL.
It will result in better contrast and more vibrant colors. What’s more, your clips will look like movie scenes. For making photos look cinematic, we recommend using bokeh overlays.

10. Film Series LUTs

cinematic luts cinema look

With the help of these LUTs, you can enhance or mix colors and adjust the lighting. If you are a fan of romantic movies, add a fairy-tale feel to your wedding or engagement footage. These tools work nicely for lifestyle vlogs as well.

DOWNLOAD FREE LUTs

DOWNLOAD Cinematic LUTs

How to identify fonts in images?

How to identify fonts in images?

 There are situations when you want to know the name of an unknown font. You can find it in different ways, but some of the more effective. I am talking about tools created specifically for font identification.

In this article, we review three solutions for fonts identification.

To find out which are the best font, I did the things below:

  • Tried solutions that I found on the web
  • Asked in places like Reddit, Quora, and forums
  • Receive recommendations from designers

By combining the above results, I found out the best three font identifiers: WhatFontIs, MyFonts, FontsNinja.

WhatFontIs

WhatFontIs was created from scratch to be the very best font identifier, being highly easy to use and efficient. With it, you will identify fonts from any image and any website.

How to identify fonts in images

Pros

  • The software has by far the most extensive database in the industry, with over 790k fonts, both free and paid
  • Works with all font foundries, including Google Fonts
  • Find with both free and paid fonts
  • For each identified font, you get 60+ free and paid font alternatives
  • The tool is 100% free to use no matter how many fonts you want to identify
  • No registration is required

Cons

  • To identify fonts from websites, you have to install the Google Chrome Extension

MyFonts

MyFonts is a fonts distributor with a large font library. It has a simple-to-use font identifier tool named WhatTheFont.

How to identify fonts in images

Pros

  • Works fast
  • Service offers many similar fonts
  • Free to use
  • Without registration
  • You can consult with the online community to find the font

Cons

  • This service defines mostly paid fonts
  • The online community does not answer all the questions
  • Quite a small font database – 130k fonts
  • No font identification from websites

Fonts Ninja

FontsNinja is a powerful app and browser extension that will help you identify fonts from websites.

How to identify fonts in images

Pros

  • Free to use with the browser extension and with the app’s trial version
  • You can find a font, their size, letter spacing, line height, and color
  • Try fonts on your computer in one click
  • Nice interface

Cons

  • No font identification from images
  • Only 20 fonts in the free trial
  • Small database

Real-life test

Now let’s see how to identify fonts using one of these tools. I selected WhatFontIs for this test.

1. Firstly, I was to take a picture of a font. I uploaded it on whatfontis.com.
2. Then I had to optimize the picture a bit: add contrast and turn down the brightness. Also, you can draw lines between letters if they are too close for better results.

Probably with high-quality pictures you can easily skip this step.

3. After that, I cropped the picture and selected the text that I wanted to identify.
4. I insert the characters that the software identified.

Family, I’ve got the following information:

  • The name of the font that I wanted to identify
  • Price
  • Download link
  • 60+ free and paid font alternatives for each identified font

The process took me just a few minutes, and I found many other cool fonts.

Conclusions

Selecting a font manually can be very difficult and time-consuming. With the services we reviewed earlier, you can speed up this process and find the font you want in just a few clicks.

How to Start a Photography Business with No Money or Experience?

How to Start a Photography Business with No Money or Experience?

Nowadays, photography is a booming industry. It’s easy to find a photography business today. Regardless if a client is living in the middle of a busy city or in a slow-paced town, for sure, there will be a photography business that fits their needs and budget. Clients might even be overwhelmed by the number of options to choose from.

This status quo might be very beneficial for clients, but if you’re someone who’s planning to start a photography business, this can be bad news. The number of photography businesses operating today makes it harder for your own to stand out. Fortunately, with the right strategies, your photography business can still become a huge success.

Just like any business, starting a photo business isn’t an easy feat. Aside from the competition, you’ll have to think about the equipment you’ll have to invest in, the location of your store and the marketing campaigns to use. Let the following tips help you start your photography business.

photography business tips

1. Using the right photography equipment can go a long way

You can never start a photography business without a camera. This is the most basic requirement for the job. If you’re a passionate photographer, you might have one already. If you’re starting from scratch and don’t have any camera yet, invest in one.

Pay attention to the following tips when you’re buying a new camera:

  • Be prepared to shell out quite a considerable amount of money. Usually, high-quality cameras come in a costly price tag. If you don’t have the budget to buy one, ask friends and family to fund your photography business. Depending on your agreement, you can pay them back once your business starts to earn.
  • Do your own research before buying your first camera. Remember that this is your investment, and the camera you buy should be useful to your business. If you have friends or family members who are also fond of photography, ask for recommendations. Don’t settle for a cheap camera thinking that you got yourself a bargain.
  • Proper care and maintenance are essential so you can utilize your camera for the longest time possible. Always handle your camera with care, and follow manufacturer’s instructions whenever you’re using it. Once you’re able to earn a steady income, you’ll be able to purchase additional equipment such as lens and flashes.

2. Having a stable internet connection is no longer a luxury but a requirement

If you do have a website, chances are it’s built on WordPress. If you plan on creating a website, that’s our recommendation too. WordPress is a platform that allows you to use plugins for virtually anything, including photo galleries. If you have no money at the beginning of your career, install the free (yet powerful) version of Modula gallery plugin and upgrade your plan as you grow the business later on.

The internet can provide unlimited opportunities for your photography business. You can basically market your services, engage with potential clients and create a brand using the internet. Having a detailed online marketing plan can even become your edge from the competition.

As a budding photographer, you can better utilize the internet by:

  • The internet is a goldmine for tools perfect for your photography business. There are tools which can help you edit and improve the quality of your photos. Let these tools become your ally so your photos can easily entice clients.
  • Having a profile in different social media accounts can also be very helpful for your photography business. Doing this is a cheap and easy way of reaching out to your target audience and educating them about your business’s existence. Just make sure that you’re able to update your social media accounts as often as possible. A client’s unanswered query on your Instagram account can create a negative brand for your business.
  • Search Engine Optimization or SEO should also be on top of your online marketing campaign. If you’re building a website for the first time, be keen on the elements that you’re adding or disregarding. Your website should be SEO-friendly for it to rank higher in the Search Engine Results Pages or SERPs. The higher the rank is, the easier it is for online users to notice your business.

stock photo design process

3. Everything about your photography business should be planned

Starting a photography business just for the sake of doing it is a bad way to start a business. Making hasty decisions will never give you the clients or profit that you need. Although it can be time-consuming and tedious, you should always start your photography business with a business plan. This document can give you a 360-degree view of the market trends, how your competitors are doing, and what your target audience’s demands are.

Carefully follow these tips when you’re drafting your business plan:

  • Always provide proof for the claims you make in your business plan. If you say that your services will take the market by storm next year, support this claim with facts. If you say your management team is fully qualified to operate different facets of your business, attach their resume and credentials to demonstrate that they are indeed the right persons for the job.
  • If you see your photography business grow in the coming years, work with a strong management team. No matter how passionate you are with photography, this business isn’t a one-man show. You can’t function as a business owner and HR officer and provide the same quality of outputs. Micromanaging doesn’t work well in businesses.
  • Having goals for your photography business is important but going overboard can also have adverse effects on your business. Only set goals and timelines which are realistic for your business to achieve. Keep in mind that you’re still a newbie and the inadequacy of money and experience can hinder you from reaching certain milestones on time.

photography business tips

4. Your outlook can make or break your chances in succeeding in the market

Being a successful photography business doesn’t come overnight; it’ll take years of determination before you can reach that goal. This notion should be planted in your mind before you enter the business arena. You should be ready to face setbacks and use these as your areas for improvement.

You can create the perfect mindset which can lead your photography business to success by:

  • Never disregard the importance of self-development. If you don’t have any experience in handling this kind of business, expose yourself to workshops and create networks with professionals in the field. Learning should never stop especially when you’re running a business.
  • Map out your goals, so you’ll know where you’re going as a professional. Determine which goals should you prioritize and which comes next. Starting a business without having any personal goals is like driving in the middle of nowhere – you don’t know where to stop or where you’re going.
  • Expect that the road towards business success isn’t straight. It’s full of twists and turns, with a lot of bumps. Instead of steering away from challenges, openly accept all of these. Some of these challenges might seem impossible to conquer, but these can bring lessons which can help you run your photography business better.

Beginnings Are the Hardest

Starting a photography business will require time, effort, and resources from you. Even if you don’t have any money or experience, you’ll likely spend so much time marketing your business and getting clients. The time you pour in your business is a significant investment that shouldn’t go down the drain. If you want your photography business to thrive and grow long-term, make sure that you start off with the right foot.